Wednesday, October 8, 2008

All Aboard!

My little guy is absolutely crazy about trains. And cars of course. Anything with 4 wheels that goes! Trains seemed like something fun to put on a cake, and I wanted to try a new technique.

Fondant painting! Our little train is hand shaped into the engine, various cars, and the gifts. The paint is simply my paste food coloring mixed with clear vanilla. The alcohol in the vanilla evaporates quickly, allowing the coloring to dry faster.


I had a lot of fun putting this together, like play dough for grown ups. This is a technique I will be playing with again!

Saturday, June 14, 2008

Sweet Baby

"Sweet Baby" was for the chocolate loving new mother at her baby shower. Deep, rich chocolate fudge cake with caramel buttercream swirled on top. The chocolate cake has additional pudding mix, chocolate chips, and sour cream for a fantastic cake that's not too sweet.


For top and bottom decoration I used a simple bead border in baby blue.

Baby booties for sweet little baby feet. Also done in buttercream, with little bows and ruffles. A very simple baby shower cake.

Sunday, June 8, 2008

Ahoy Matey!

Are you ready for a "lootin" good time? This cake was a perfect pirate cake, and what better treasure than a yummy caramel buttercream under all that fondant. Made for a pirate themed party, this is a full sized sheet cake. Frosted with delicious buttercream and then covered in rolled fondant. I colored the fondant green with cake decorating spray.


A yummy, gummy shark border keeps little hands away! The kids were served a gummy shark with each piece, these were laid in place, not glued with frosting.


The palm trees are made of shaped fondant, with wire reinforcing. Green tinted white chocolate palm leaves are attached to fondant and wire bases. I mounded frosting around the base for added stability and sprayed it green for "bushes".


A friendly little shark patrols the river. A little far upstream aren't you? With crushed graham cracker sand, and piping gel tinted blue for water, this little stream is a yummy mouthful.
The treasure chest candle was found at a local party supply store.

Sunday, June 1, 2008

Another Graduation

One of the parents of the church group teens asked me to make a cake for her daughter's private party. She also wanted a personalized picture of her daughter, throwing her hat and holding her diploma. The diploma is fondant, rolled into a tube.


A "Funfetti Border", was a lot of fun to do.

To add color to the side, I added orange curliques with black dots. She loved the look of the cake.

Here Kitty!

This cute little kitten graced a little girl's birthday with her presence. I modeled it after her cat, a tabby striped calico with blue eyes.


This pan is "Animal Crackers", by Wilton. The shaped pan has rounded ears, for teddy bears. I shaped the points with frosting. Those two were some of the favorite pieces!

A Swimming Good Time

My son, for his 4th birthday, requested a "waterpark cake". As luck would have it, I had just recieved a magazine, with this cake on the cover.

This was a difficult cake to put together. The top layer of the cake had a cutout section, shaped like a jelly bean. I put the two layers together and poured almost set jello into the cutout. I piped little swimsuits onto teddy grahams, and used blue M&Ms for the border. The water slide is heated Airhead candy, shaped and positioned, with melted white chocolate to fill it. Blue sprinkles on top simulate water. The sand is graham cracker crumbs. This was a big hit, with children and parents alike.

Graduates 2008

Some of the youth at my church were graduating this year. I was asked to do the cake for the graduation party. They requested a personalized cake, a figure for each senior. I incorporated their school colors, orange and black. The top border is a grass tip, which I swirled for a unique look.


Most of the people had tried the frosting before, but the new ones hadn't tasted my cakes. There was none left, of a full sheet cake.

A Rose by any other Name

A simple sheet cake, yellow with buttercream frosting. I was asked to provide a cake for a church function, for a group of ladies. Roses seemed fitting for a ladylike occasion. Deep burgundy compliments a deep golden yellow with simple star drop flowers.


Here, a detail shot of the roses and star flowers. I used two sizes of roses, a full size rose for the center, and the outlying roses have one less row of petals.


The border is a simple shell border. To bring out the main golden yellow color, I piped the star flowers on the shells.

Lacey

Cornelli Lace is one of the harder decorating techniques, but is a beautiful effect. The surface is covered with piping, the line is continuous and cannot touch or cross itself. I did this cake for a friend's open house, where they had requested a very simple sheet cake.

I really liked the effect of the border of cornelli lace. It was a nice touch to formalize this simple cake, to fit the occasion.

Basket of Flowers

I really like to do daisies. They are one of my favorite flowers, so pretty and casual. Brown Eyed Susans are simply a variation on a daisy. Here I paired the Brown Eyed Susans with tiny, dark blue Apple Blossoms.


The side is a basketweave effect. I finished it with a rope border on the bottom, and the flower border surrounds a simple font on the top. The flowers are royal icing, and were dried on flower formers for a more realistic curved look.

A Little Bit of Pixie Dust

This cake was one of my favorites. This was for a little girl's first birthday. The customer was doing a Tinkerbell invitation, and asked to have the picture of Tinkerbell on the main cake. I blew the image up, traced a mirror image, and imprinted it onto the cake. I then filled her in with a star tip. Her wings were outlined, then filled in with a sparkly edible glitter.


She invited over 100 people, so we did several cakes. A large Tinkerbell, smaller "Happy Birthday", a second small one with a tiara purchased by the customer. Also, I did a small, 6-inch smash cake for her daughter. She was allergic to eggs and dairy, so I did a spice cake that was egg, milk, and butter-free. All were frosted in a cream cheese frosting.

Wreath of Holly

I created this cake with it's vining holly side border for a friend's workplace holiday party one year. I had never done holly before, but I had a lot of fun doing this simple little cake.


Fall-ing in Love

I love the fall. Early fall, when flowers are still blooming and the colors are rich and vibrant with the change of season. This cake was for a wedding open house style reception. We weren't sure how many people were going to be coming through, so we made plenty. A typical two tiered wedding cake, with an additional matching sheet cake just in case.

When doing tiers, pre-assemble the cake before delivering to make sure it all fits and the colums are positioned correctly. Then take it apart and transport with colums in place. You reassemble the cake at the event. So here are shots of the seperate tiers, the final cake, and the extra sheet cake.


I used white daisies, blue forget-me-nots, red primroses, and rusty chrysanthemums. Top and bottom borders are the shell borders, and I used a ruffled garland on the sides.

A Beary Special Baby


A friend of mine was having a baby shower, and requested that I make one of my cakes. She had tasted my frosting from one of the class cakes I had made, and loved it. My buttercream is not the normal: too sweet, too almond, too thick. Mine is more caramel, creamy, and a lighter texture.


Her friend throwing the shower was going for a bear theme and gave me one of the invitations. I copied the stamped bear image onto the cake, and filled it in with a star tip. Also a simple large star border on top and bottom.

Happy 30th Birthday!

A friend told one of their other friends that I loved doing cakes. I had just finished the classes, and was trying to put myself out there for more practice. She was given my number and called, asking if I could do a cake for a large birthday party. We spoke on the phone, and decided that I would do 2 9x13 cakes, one chocolate and one vanilla. The exclamation point is the pieces of cake that I cut out to form the numbers. She wanted bright, almost neon obnoxious colors, so I went to town on the food color gel. I had never done anything this bright, it was interesting...


This cake was huge. I used 4 large pieces of cardboard taped together, 2 pieces per layer, to support the cake. She loved it, although it was bigger than she had thought it would be. There was plenty to go around, and I had my first taste of doing business.

Saturday, May 31, 2008

Sotas? Sotas Anyone?

Course 3, Wedding Cakes!


I had survived the first two grueling courses. Hey, it's hard work learning not to lick the frosting off your fingers! I think everyone was sick of frosting after the second week, and those who buy my cakes need not fear me licking. I don't actually eat my cakes very often, I have played in the frosting too much.


For my last assignment, I chose to do a chocolate cake. Tip: chocolate cake is one of the worst for crumbs. Plus, the crumbs also show up the worst. Well, not thinking about this, I ended up with the worst crumbs all over the frosting of the wedding cake. PANIC!


Then I remembered a decorating technique. Very sophisticated, daring, bold... The Sotas! This "hard to master" (wink wink) technique consists of getting a very small round tip, thinning out your frosting, preferably with a tiny bit of karo syrup or piping gell, and squeezing the bag like crazy. All over the place, like a frosting pile of angel hair pasta. Seriously! I tell you what, it not only works fabulous, the teacher was impressed (as was the class), and you couldn't see a single crumb!

Finished, in all it's glory!

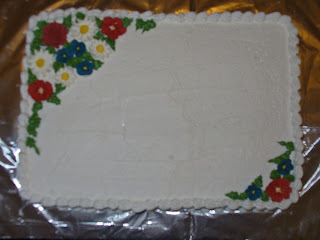
A top view. You can really see the amazing texture the sotas gives the cake. The flowers are petunias. Beautiful flowers, and actually quite easy to do.

Just a detail shot of the top. The petunias have stamens in the middle, if you look closely, just like the real flower. These are plastic balls on top of hard strings that you set in the flower before it dries.

Incidentaly, my son's speech therapist came to work with him the next day and saw the cake sitting on the table. She was so impressed that she bought the top of the cake from me to take to work for a friend's birthday! Less cake I had to eat...

It Rained Flowers

This cake was my course 2 assignment. We learned some color flow basics, which is a mixture that is thinned out, poured into a shape, and left to harden. We also learned several types of flowers with petals that are shaped. Pansies, Daisies, Daffodils, and several more. Again, I did several flowers in royal icing. The ones I liked all got piled on top and cascaded down the side. I have done the cascade on other cakes, but lost those pictures.

I also used a reverse shell border. You do a shell in one direction, then switch to the opposite direction, and so on. This border is quite easy to get mixed up on, and takes lots of concentration if you are doing a large cake. I also like the Oval cake pan set that was used here. Now, if only my color flow butterfly hadn't broken...

Friday, May 30, 2008

My First Class Cake

This cake was the first one I was assigned and brought to class. It is a basic exercise in drop flowers, leaves, stems, and writing. All are covered in Wilton's first class. I was so excited to start the class and learn more about doing cakes. I had taken in high school, a Christmas gift from my parents. But several years later, a friend asked if she could borrow my oven, hers was on the fritz, and she needed to bake a cake for her class. I remember sitting there watching her do flowers and thinking "I could do that!" So I signed up and away I went!


For this one, I made lots of simple drop flowers in different colors. In class we only played with white frosting, so I went crazy at home. The best ones I set aside, and used on top of the assignment cake. There are flowers on the side as well. This cake taught me the importance of planning, at least a little, your design.

Welcome!

Hello All!

It has been mentioned by many that I should have a blog to show off the cakes that I have done. I thought about it and decided that was a great idea. Why not? I have a portfolio of cakes I have done that I keep to show perspective clients, but no one else gets to see them unless they are eating them!

So keep watching, and I will get up and running soon, with yummy pictures of delicious cakes, the making-of details, and finger-licking recipes!

Michelle